How To Use A Business Card Template
admin
In this tutorial, we will be going over our how to use a business card template by looking at the purpose of various elements in the template file. We place every order on one of these templates before we submit them to print. Therefore, knowing your template is crucial to providing print ready artwork.
 The template has 3 layers, notice that only 1 layer is unlocked. Please keep the bottom two layers locked.

Download Your Template:
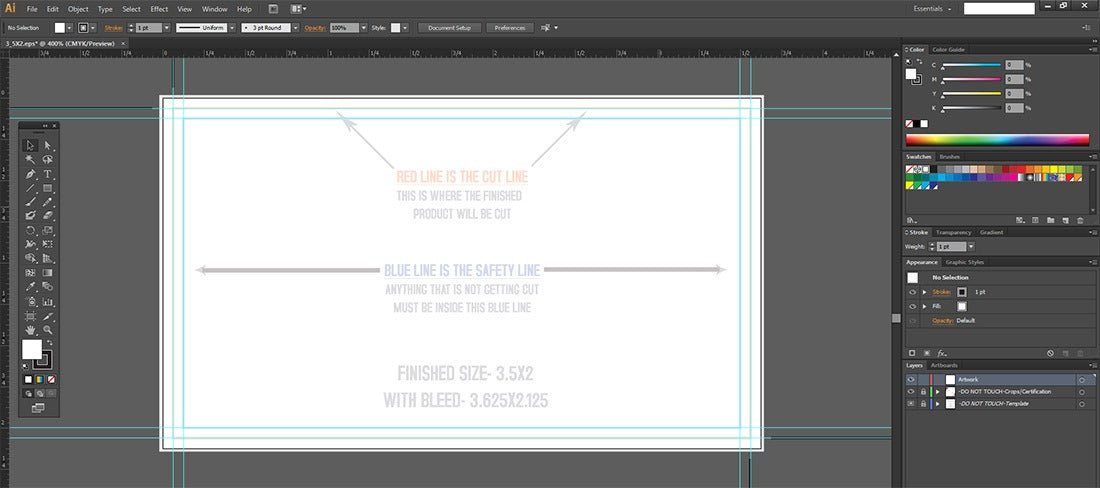
We provide free templates on our website in vector .eps format. These templates are for use in vector design programs such as Adobe Illustrator, or with photo editing software like Adobe Photoshop. After downloading your template file, open it in your design software. In this tutorial, we are using the template for 2x3.5 Standard US Business Card in Adobe Illustrator. So, when you open the template, your screen will look similar to what you see above. By default the template should be in CMYK Color Mode but if not you will need to make sure you change it to CMYK.
Know Your Template:
First of all, looking at the template you will notice, three very important lines.- The Black line denotes the edges of the bleed, you will want your background color/pattern to stretch to at least that line.
- The Red line shows where the card will be cut to its final dimensions.
- The Blue line denotes the boundaries of the “Safe Area”. This area will not be affected by card cutting. All important information like names, titles, and contact information should be kept within its boundaries.
The template has 3 layers, notice that only 1 layer is unlocked. Please keep the bottom two layers locked.
- Artwork - All artwork needs to be on this layer.
- -DO NOT TOUCH -Crops/Certification - this is for internal use. Do not adjust.
- -Do NOT TOUCH-Template - this layer includes all the template information such as the light blue guidelines, bleed lines, cut lines, safe area, etc... Likewise, there is no need to adjust to this layer.